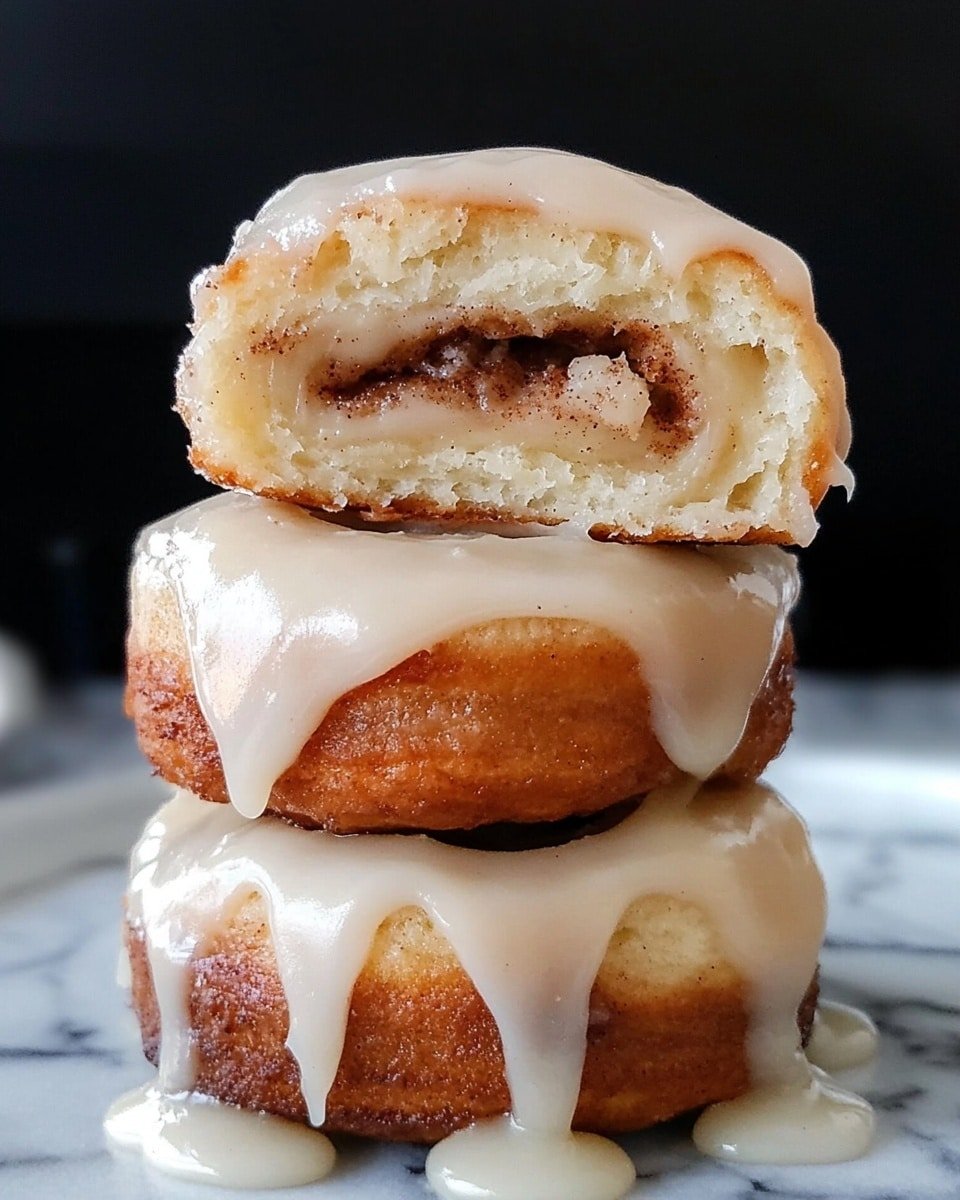
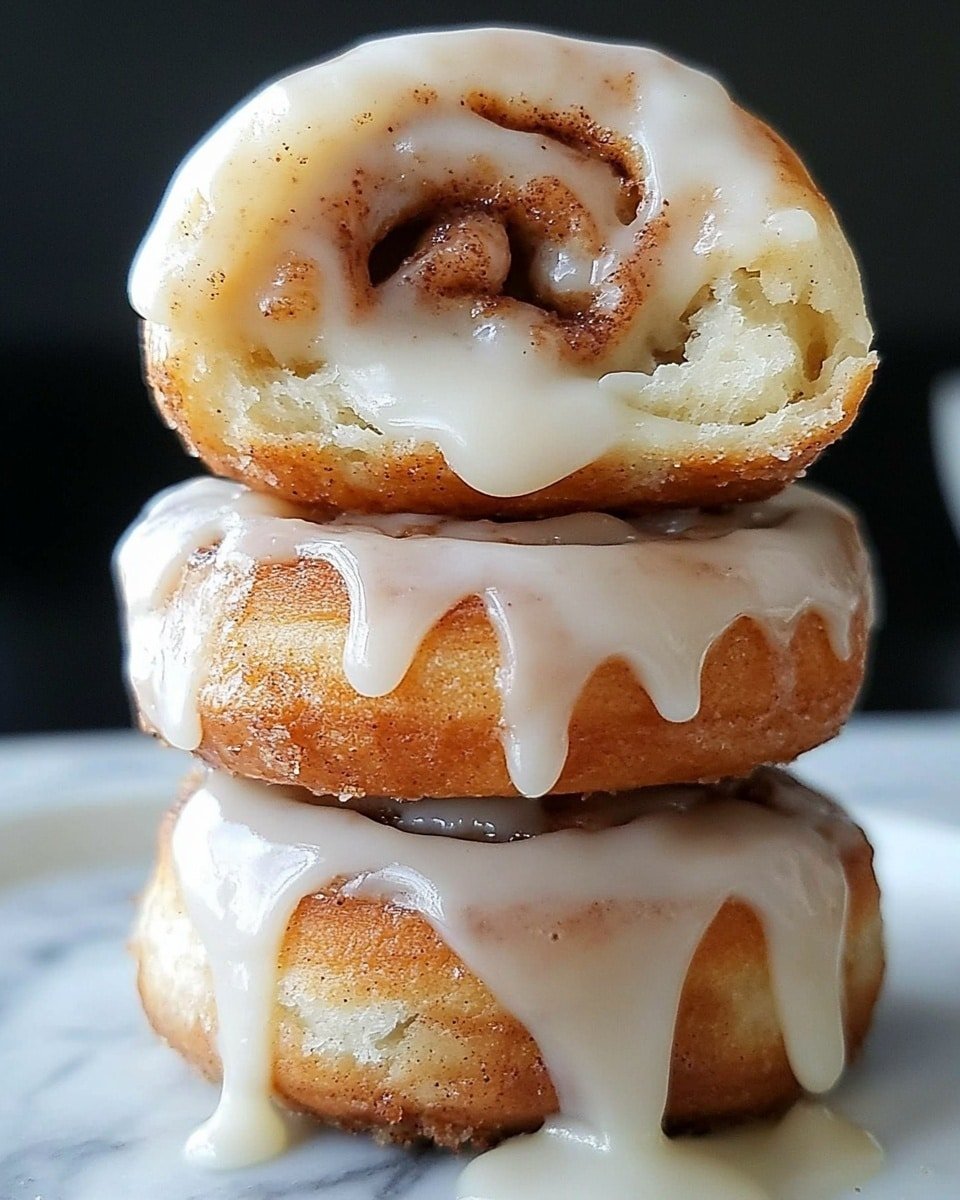
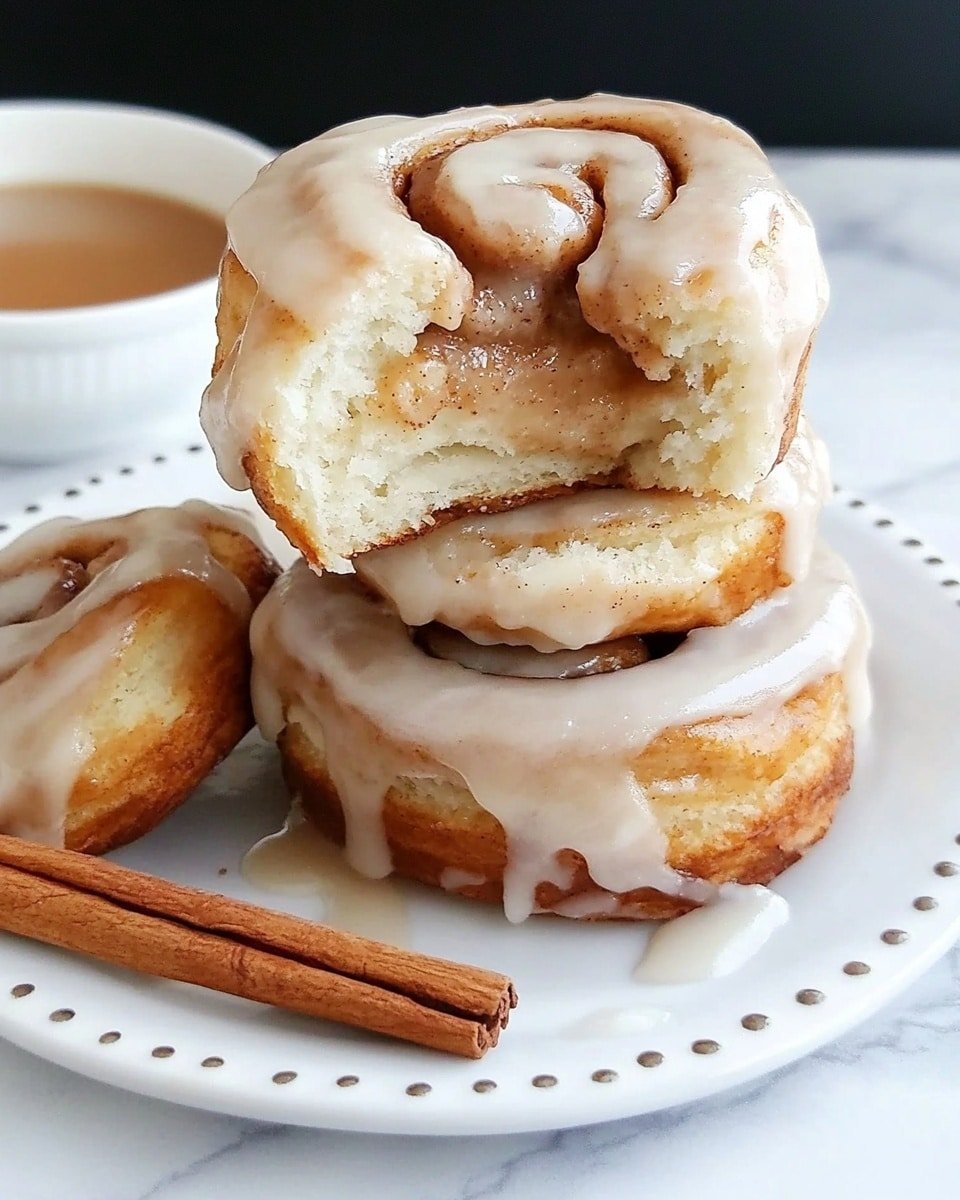
There’s something utterly magical about biting into soft, sweet, and perfectly glazed honey buns fresh from your own kitchen. This Homemade Honey Buns Recipe promises exactly that: a delicious treat with a tender crumb, a cinnamon swirl, and a luscious honey-infused icing. Whether it’s for breakfast, brunch, or a cozy snack, these honey buns will become your new favorite homemade indulgence.
Why You’ll Love This Recipe
- Classic Comfort in Every Bite: These honey buns are perfectly soft and fluffy with a hint of cinnamon that reminds you of cozy mornings.
- Made From Scratch: No shortcuts here — you control every ingredient, making them wholesome and irresistible.
- Deliciously Forgiving Dough: The dough is easy to work with whether you’re an expert baker or just starting out.
- Sweet, Honey-Kissed Glaze: The icing is the perfect finishing touch, sweet but never overwhelming.
Ingredients You’ll Need
This Homemade Honey Buns Recipe relies on simple, familiar ingredients that come together to create those wonderfully soft buns with a cinnamon swirl and a honey-flavored glaze. Each ingredient plays a vital role — from the tenderizing melted butter to the instant yeast that helps create the perfect rise.
- All-purpose flour: The backbone of your dough, providing structure and softness.
- Sugar: Adds subtle sweetness to balance flavors.
- Salt: Enhances all the other flavors and keeps the dough balanced.
- Whole milk: Adds richness and moisture for a tender crumb.
- Instant yeast: The magic that makes your dough rise beautifully and become fluffy.
- Butter (melted): Brings tenderness and a lovely buttery flavor.
- Egg: Adds moisture and helps bind the dough for a perfect texture.
- Vanilla extract: Gives a warm, sweet aroma that complements the honey.
- Cinnamon: For that classic warm spice swirl inside the honey buns.
- Vegetable oil: Used both in the dough for richness and for frying the buns to golden perfection.
- Powdered sugar, honey, and butter (for the icing): These ingredients create a smooth, glossy glaze with that distinctive honey sweetness.
Variations
One of the best things about this Homemade Honey Buns Recipe is how adaptable it is. Whether you want to switch up the filling, accommodate dietary needs, or add your own twist, these buns are a fantastic canvas for creativity.
- Nutty Delight: Add finely chopped pecans or walnuts to the cinnamon sugar for an extra crunch.
- Gluten-Free Version: Use a gluten-free flour blend and adjust liquids slightly to keep the dough soft and manageable.
- Maple Cinnamon: Swap honey in the icing for maple syrup for a rich, deep flavor profile.
- Orange Zest Twist: Mix in some fresh orange zest into the dough for a bright, citrusy note that pairs beautifully with honey.
How to Make Homemade Honey Buns Recipe
Step 1: Prepare and Mix the Dough
Start by combining your dry ingredients — flour, sugar, and salt — in the bowl of a stand mixer fitted with a dough hook. Warm the milk until it’s about 110°F, then whisk in the instant yeast, melted butter, egg, and vanilla extract. Pour this mixture into the dry ingredients and knead on medium speed for about 10 minutes, scraping down the sides occasionally to ensure everything is well incorporated.
Step 2: Let the Dough Rise
Grease a large bowl with a touch of vegetable oil. Shape your dough into a smooth ball and place it into the bowl. Cover tightly with plastic wrap and allow it to rise for 1½ hours, or until it doubles in size. This resting time allows the gluten to relax for a tender bun, and the yeast to work its magic for a light texture.
Step 3: Roll, Sprinkle, and Slice
Press down the risen dough gently with clean hands and transfer to a lightly floured surface. Roll it out into a 15-by-8-inch rectangle. Sprinkle cinnamon evenly across the rectangle, then carefully roll the long side into a tight log. Wet your fingers and press along the seam to seal it well. Using unscented floss or a sharp knife, cut the log into 1-inch thick slices.
Step 4: Second Rise and Frying
Place the cut buns on wax paper, spray them lightly with non-stick cooking spray, and cover with plastic wrap. Let them rise for another 30 minutes with some space left between each piece to expand. Meanwhile, heat 2 to 2½ cups of vegetable oil in a large pan over medium heat. Once hot, fry the buns in batches for a few minutes on each side until they’re beautifully golden brown. Drain on paper towels to absorb any excess oil.
Step 5: Make the Icing and Glaze
While the buns cool slightly, whisk together melted butter, powdered sugar, milk, honey, and vanilla extract in a small bowl until smooth. Dip the warm honey buns tops into the icing, then set them on parchment paper to let the glaze harden. It’s pure heaven to watch the shiny glaze set and know you made these yourself!
Pro Tips for Making Homemade Honey Buns Recipe
- Warm Your Milk Just Right: Hotter than 110°F can kill yeast; cooler means slow rising. Use a thermometer for best results.
- Don’t Skip the Second Rise: It’s crucial for that pillowy softness and lovely crumb texture you crave.
- Use Unscented Floss to Slice: This keeps the dough slices intact without squishing the rolls.
- Watch Oil Temperature Closely: Too hot burns the buns outside; too cool results in greasy buns—aim for medium heat and patience.
How to Serve Homemade Honey Buns Recipe
Garnishes
These honey buns are stunning as-is, but if you want to jazz up your presentation, sprinkle some finely chopped nuts like pecans or walnuts on the icing before it sets. A tiny drizzle of extra honey or a dusting of powdered sugar also adds a lovely finishing touch and an extra hint of sweetness.
Side Dishes
Homemade Honey Buns are a perfect pair with a hot cup of coffee, chai tea, or even a cold glass of milk. If you’re serving brunch, fresh fruit or a creamy yogurt parfait complement the sweet buns beautifully, balancing flavor and texture.
Creative Ways to Present
Arrange the honey buns in a rustic basket lined with a linen napkin or stack them in a tiered cake stand for a charming display. For a party, place individual buns in pretty cupcake liners and drizzle extra glaze over the top right before serving for a dazzling look.
Make Ahead and Storage
Storing Leftovers
Store your leftover honey buns in an airtight container at room temperature for up to 2 days to keep them soft and moist. After that, refrigeration can help extend freshness, but bring them back to room temp or warm slightly before enjoying to revive their tender texture.
Freezing
If you want to freeze your honey buns, place them on a baking sheet in a single layer and freeze until solid, then transfer to a freezer-safe bag. They’ll keep well for up to 3 months. Thaw at room temperature before reheating or glazing for best results.
Reheating
To enjoy your Homemade Honey Buns warm and fresh, reheat them in the microwave for about 15-20 seconds or pop them in a 350°F oven for 5-7 minutes. This helps re-soften the dough and slightly melts the glaze, giving you that just-baked experience all over again.
FAQs
-
Can I use regular active dry yeast instead of instant yeast?
Yes, you can! If using active dry yeast, you’ll want to proof it in warm milk with a pinch of sugar for about 5-10 minutes until foamy before mixing it with the other ingredients. Instant yeast can be added directly to the dry ingredients, which makes the process even simpler.
-
Is frying necessary or can I bake the honey buns?
Traditionally, honey buns are fried to give that signature golden, slightly crispy exterior with a soft inside. However, you can bake them at 375°F for about 15-18 minutes if you prefer a lighter option. They won’t have quite the same texture but will still be delicious!
-
How do I keep the buns from absorbing too much oil during frying?
Make sure your oil temperature is steady at medium heat—not too low or high. If the oil is too cool, buns absorb more oil. Use a thermometer if possible, and avoid overcrowding the pan to maintain temperature consistency.
-
Can I make the dough and freeze it before frying?
Absolutely! After shaping and slicing the buns, place them on a lined baking sheet, freeze until solid, then transfer them to a freezer bag. When ready, thaw and let rise before frying for fresh-tasting honey buns anytime.
Final Thoughts
There’s nothing quite like the joy of homemade goodies, and this Homemade Honey Buns Recipe delivers that comforting satisfaction with every bite. From the fluffy cinnamon swirl to the sweet honey glaze, these buns are a celebration of classic flavors that you’ll want to make again and again. Go ahead, treat yourself and those you love to something warm, sweet, and made just for you!
PrintHomemade Honey Buns Recipe
These homemade honey buns are soft, sweet, and perfectly fluffy with a delightful cinnamon swirl, fried to golden perfection and topped with a smooth honey-infused icing. This recipe combines the classic charm of bakery-style honey buns with a rich, homemade touch, ideal for breakfast, brunch, or a special treat.
- Prep Time: 2 hours 45 minutes
- Cook Time: 15 minutes
- Total Time: 3 hours
- Yield: 14 honey buns
- Category: Breakfast, Snack, Dessert
- Method: Frying
- Cuisine: American
Ingredients
For the Honey Buns
- 2 1/4 cups all-purpose flour
- 1/4 cup sugar
- 1/2 tsp salt
- 2/3 cup whole milk
- 1 packet instant yeast (2 1/4 tsp)
- 1/3 cup butter, melted and cooled
- 1 large egg
- 2 tsp vanilla extract
- 1 1/2 tsp vegetable oil
- 2 tsp cinnamon
- 2 to 2 1/2 cups vegetable oil, for frying
For The Icing
- 3 tbsp butter, melted
- 1 1/4 cup powdered sugar, sifted
- 2 tbsp milk
- 2 tsp honey
- 1/2 tsp vanilla extract
Instructions
- Prepare Dry Ingredients: In a stand mixer bowl fitted with a dough hook, combine 2¼ cups all-purpose flour, ¼ cup sugar, and ½ tsp salt. Mix briefly to combine.
- Warm Milk & Mix Wet Ingredients: Heat ⅔ cup whole milk in the microwave for about 30 seconds until it reaches 110°F. Add 1 packet instant yeast, ⅓ cup melted and cooled butter, 1 large egg, and 2 tsp vanilla extract to the warm milk. Whisk together until well combined.
- Knead Dough: Pour the wet ingredients into the stand mixer bowl with the dry ingredients. Knead on medium speed for 10 minutes, using a spatula to scrape down the sides occasionally to ensure even mixing.
- First Dough Rise: Lightly grease a large bowl with vegetable oil. Form the dough into a ball and place it in the greased bowl. Cover with plastic wrap and let it rise for about 1½ hours or until the dough doubles in size.
- Shape Dough: After the dough has risen, punch it down with clean hands and transfer it to a lightly floured surface. Roll or press the dough into a rectangle approximately 15 inches long and 8 inches wide.
- Add Cinnamon: Sprinkle 2 tsp cinnamon evenly over the dough surface.
- Roll and Seal: Roll the long side of the dough into a log shape. Dip your fingers in water and moisten the edge of the dough, then pinch the seam tightly to seal the roll.
- Cut Buns: Use unscented floss to slice the dough log into 1-inch thick buns. Place the buns on a piece of wax paper.
- Second Dough Rise: Spray the tops of the buns with non-stick cooking spray and cover loosely with plastic wrap. Let the buns rise for 30 minutes, leaving space between each bun to allow them to expand.
- Heat Oil for Frying: In a large pan, heat 2 to 2½ cups vegetable oil over medium heat until hot but not smoking, suitable for frying.
- Fry Buns: Carefully place a few buns at a time into the hot oil. Fry each side until golden brown, about 2 to 3 minutes per side. Remove and drain on paper towels to absorb excess oil.
- Prepare Icing: While the buns are cooling slightly, mix 3 tbsp melted butter, 1¼ cup sifted powdered sugar, 2 tbsp milk, 2 tsp honey, and ½ tsp vanilla extract in a small bowl until smooth.
- Ice Honey Buns: Dip the warm buns tops into the icing. Place the iced buns on wax or parchment paper and allow the icing to set before serving. Enjoy your homemade honey buns!
Notes
- Make sure the milk is warmed to 110°F to activate the yeast without killing it.
- Use unscented floss or dental floss to cut the dough for clean, even buns without squashing the dough.
- Maintain medium heat to fry the buns evenly without burning.
- Allow buns to cool slightly before icing so the glaze sets properly.
- Keep extra icing refrigerated and stir before using if it thickens.
- This recipe yields 14 honey buns, perfect for sharing or freezing for later.

